PicoScope 7 Automotive
Available for Windows, Mac, and Linux, the next evolution of our diagnostic scope software is now available.
Automotive guided tests
Library of examples on how to perform tests when using PicoScope.

Training
Our collection of training videos, articles, guides and information on training courses.

Waveform library
The Waveform Library is a global database of waveforms uploaded by PicoScope users.

Case studies
Real-life case studies show how the professionals use PicoScope to diagnose vehicle faults.

A to Z of PicoScope
Detailed description of various PicoScope software and hardware features.

Videos
Training resources and demonstrations on PicoScope and the Automotive Diagnostics Kit.

Newsletter
Archive of our monthly Automotive Newsletters.

Documentation
Download manuals, brochures, posters, and training materials.

Reviews and awards
Accolades for the preferred diagnostic tool for service centers and vehicle manufacturers.


Pico NVH Starter diagnostic kit (in carry case)
*At Pico we are always looking to improve our products. The tool used in this guided test may have been superseded and the product above is our latest version used to diagnose the fault documented in this case study.
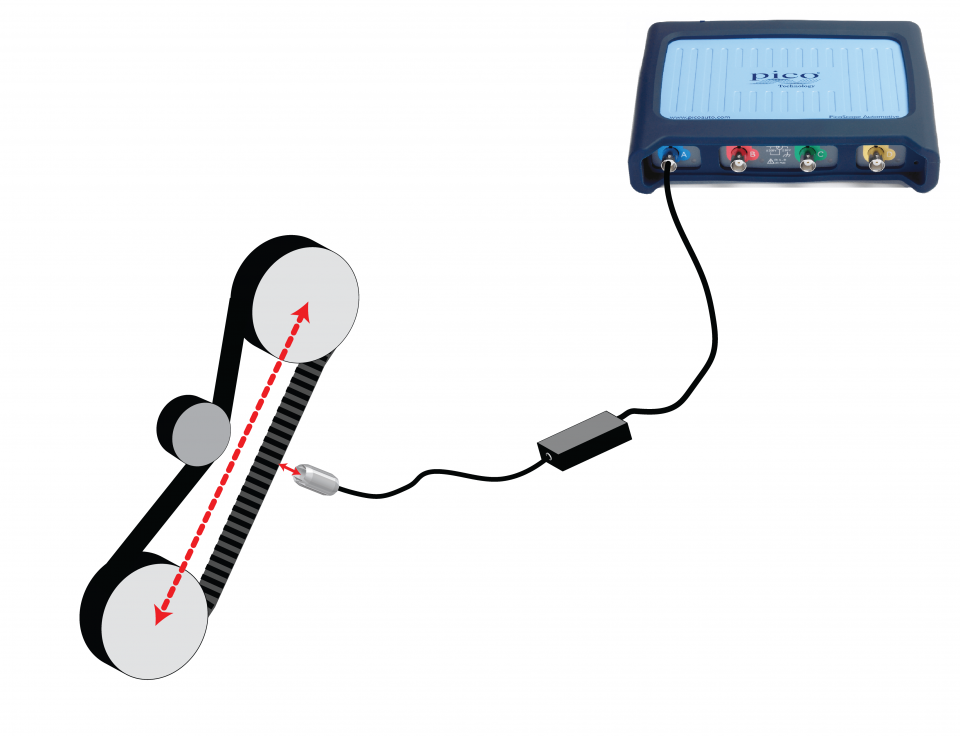
The purpose of this test is to measure the natural frequency of a belt (auxiliary or timing), as a means to check the applied tension.
Note
Shield the microphone to prevent erroneous readings, if background or wind noise is excessive.
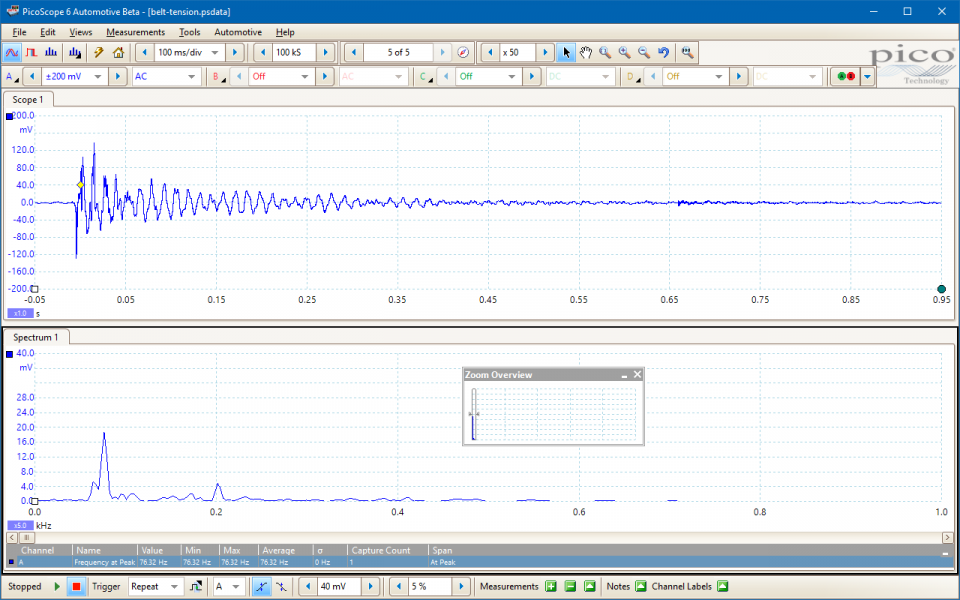
The “Scope 1” tab shows:
The “Spectrum 1” tab shows:
The Measurements table shows:
Calculating belt tension from vibration frequency
The test methodology is based on the theory of vibrating strings.
Strumming imparts a momentary force to the belt. If the belt is under tension, this will cause it to vibrate at its natural frequency (i.e. the frequency that occurs with free vibration rather than with a constant forced vibration).
The belt’s natural frequency decreases with length and increases (non-proportionally) with the tension per unit mass. Therefore, the shorter the belt and the higher the tension, the higher its natural frequency.
We can calculate the tension within a belt if we measure its natural frequency and know its length and mass.
For a string, the general relationship is given by:
T = 4 ∙ m ∙ l2 ∙ fn2
Where:
T is the tension, in newtons
m is the mass per unit length, in kilograms per meter
l is the belt span, in meters
fn is the natural frequency, in hertz
For example, a string of length 0.5 m, unit mass 0.001 kg/m, vibrating at 223.6 Hz has a tension given by:
T = 4 ∙ 0.001 ∙ 0.52 ∙ 223.62 N
T = 4 ∙ 0.001 ∙ 0.25 ∙ 50000 N
T = 50 N
T = 4 ∙ 0.001 ∙ 0.25 ∙ 50000
T = 50 N
As belts are more complex structures than strings, belt manufacturers use variations of the above equation. For example, they need to account for the width of the belt using the number of ribs or strands, or the mass per unit area (rather than mass per unit length). However, the underlying principle is the same. For this reason, you must follow the procedures, data and calculations specified by the belt manufacturer.
The following webpage provides access to data and calculation methods from a variety of belt manufacturers:
Faults, effects, and symptoms
All belts attached to the engine’s crankshaft pulley must be properly tensioned and aligned to ensure auxiliary and timing systems can be driven efficiently.
Tension with a force above or below specification can cause excessive stress and strain or excessive movement of the belt, pulleys, and tensioners. Symptoms may be:
Other indications of actual or impending belt drive problems are:
GT890-EN
Disclaimer
This help topic is subject to changes without notification. The information within is carefully checked and considered to be correct. This information is an example of our investigations and findings and is not a definitive procedure.
Pico Technology accepts no responsibility for inaccuracies. Each vehicle may be different and require unique test
settings.
We know that our PicoScope users are clever and creative and we’d love to receive your ideas for improvement on this test. Click the Add comment button to leave your feedback.


