PicoScope 7 Automotive
Available for Windows, Mac, and Linux, the next evolution of our diagnostic scope software is now available.
Automotive guided tests
Library of examples on how to perform tests when using PicoScope.

Training
Our collection of training videos, articles, guides and information on training courses.

Waveform library
The Waveform Library is a global database of waveforms uploaded by PicoScope users.

Case studies
Real-life case studies show how the professionals use PicoScope to diagnose vehicle faults.

A to Z of PicoScope
Detailed description of various PicoScope software and hardware features.

Videos
Training resources and demonstrations on PicoScope and the Automotive Diagnostics Kit.

Newsletter
Archive of our monthly Automotive Newsletters.

Documentation
Download manuals, brochures, posters, and training materials.

Reviews and awards
Accolades for the preferred diagnostic tool for service centers and vehicle manufacturers.

| Vehicle details: | Chevrolet Uplander |
| Year: | 2007 |
| Symptom: | Poor performance, Poor starting |
| Author: | Nic Duncan |
So, this van, a 07 Uplander, came from another shop, a dealership to be exact.
To make a long story short, $2,200 later and with a replaced crank sensor, new knock sensors, a tune up, new wires to the crank sensor to eliminate bad wiring faults, etc, it was still not fixed. I’ve been trying to work on my diagnostics skills, so my tech took it on for me to have a challenge to work on.
I got out there and started it up. Well, I tried to. It attempted to start but I could tell it had ignition problems. It would start but then die, backfire, attempt to start, run for a second, and die. I finally got it running and the warmer it became the better it seemed to run. I tried to take it down the road and it had absolutely no power, like, nothing!
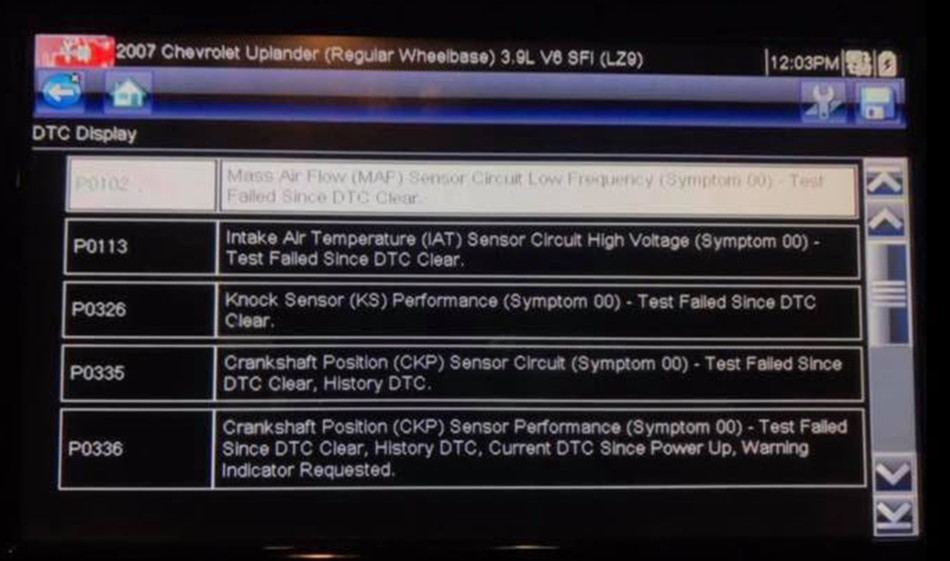
So, I got it in the bay and pulled codes. It had stored codes for MAF, IAT, knock sensor, and crank. I saved the screen and cleared it. Then I checked for hard codes. The crank code was instant with cranking, so I decided to go after that.
I put the vehicle on the ramp, looked at the crank sensor and saw that it wasn’t in all the way. I grabbed a long screwdriver to secure it back on, but there was no click. By using the borescope, I could see that the connector was broken. Also, I did overlook an important clue which you’ll come to find out soon.
After pushing it back on I wanted to see what the crank signal looked like. I captured it from the PCM since that was easier. Now, at this point, I didn’t fully examine the waveform. I should have zoomed in and looked at everything, as I may have missed a clue being a dropout. However, being an apprentice who is still learning, to my untrained eye it looked ok.
Seeing it switching from 5 V down to approximately 780 mV I thought the latter was a little high, so I decided to check the ground. On a ‘07 Uplander, the connector for the crank sensor itself is an absolute nightmare to get to with a back-pinning probe so I got into the harness on the side, which has a removable Y connector for the knock sensor and crank. I got my captures: a 5 V reference, the signal and the ground. Everything was ok.
After prying the connector on, I improved the connection (it’ll make sense soon) and it ran without further problems. So, my tech ordered a new connector. We took the car for a nice long drive on back roads, and it ran well. There were no codes, it was reading data, etc. When we returned, we had the MAF IAT code back again. I felt that the MAF was dirty due to the high readings of grams per second, so we cleaned it. This fixed the high readings and the MAF code stayed away.
Then we found out that the customer had found the harness hanging down and had plugged it back in. That explained the knock sensor code.
But then, when I got in the next day, boom! The vehicle had all the same issues back. We drove it there the day before, with no problems, and now it’s acting up again. The crank codes were instant, so I pulled it in, replaced the connector. While the harness was out, and since I couldn’t back probe at the crank sensor itself, I wanted to make sure there weren’t any issues with the harness. Since I had checked at the Y connector, I could be missing a bad ground or 5 V reference.
I quickly used the ohm meter. Yes, it was just static. So, I decided to load test to confirm. All good. OK, so the Y connector was a good place to get my signals. I put it all back together and got my PicoScope ready. This time I analysed the waveform more thoroughly and caught the dropout in the crank sensor while confirming I still had 5 V and good ground.

I decided to consult my friend, Mick Jones, who I also purchased the PicoScope from. He has been an amazing mentor for me, helping with any questions I have. Also, two local guys, who purchased PicoScopes from him as well, have really helped to show me the ropes through our group chat.
Mick said that he would normally see 100-200 mV. But since I had a good 5 V and ground, I figured it was ok. I had a good feeling about it. I know the alternator was noisy but it was not bad enough for this kind of issue.
I was still trying to solve this puzzle myself, but I was stumped. All the connections were good, we had a new sensor, what else could it be? I asked Mick where to go next. He had a waveform he previously sent me with the same kind of problem. It looked like it was having the same symptoms as my current vehicle.
.png)
The crank sensor on the vehicle his waveform had been captured from had a gap. I never thought about it because I had never encountered it before. When I thought I had everything checked I was missing the last important step. A proper gap. When looking into this, I saw a slight rise in the crank sensor. I removed it and took some pictures. Luckily, I had a small needle de-scaler, and I was able to clean up the sensor’s hole in the crankcase. I had a zip tie with a rag in the hole so no contaminates could get inside the engine.


I have learned that this is something to always keep in the back of our heads. With ABS sensors and crank sensors, we must not overlook a potential gap.

I’m fortunate to have groups on social media where I can learn from and I’m trying to help others that want to learn like myself as well. We have a great community going on Facebook, with a ton of likeminded individuals. So, if you haven’t followed Scanner Danner, Cody’s Auto Diagnostics, Super Mario Diagnostics, Diagnose Dan, Simply Diagnostics and many others that I have not mentioned, you’re missing out. These channels have great info and I recommend them to anyone who wants to learn! Thanks for your time and I hope you liked my diagnostics write-up.
Janine Valerio
August 04 2020
An excellent post, congratulations !!
David K Paterson Autotechnique Ltd
May 26 2019
Well done! Great to see such enthusiasm and the will to be a good diagnostician. I enjoyed your write up. You’re right, there are some great mentors out there, and we are lucky in this day and age to have so much help: literally at our finger tips! Keep at it, and never overlook the basics 😉


